
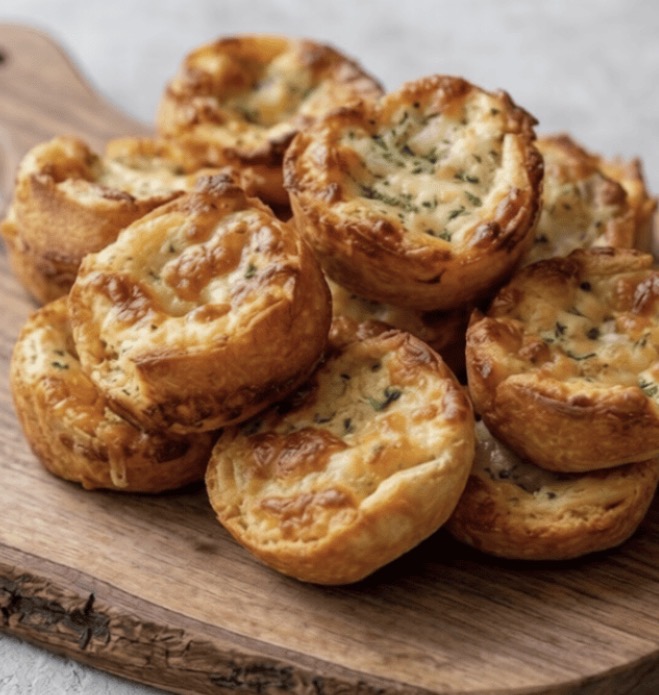
Why This Recipe Is an Absolute Keeper
Before we dive into the method, here’s why these garlic rolls will become a staple in your kitchen:
-
Zero waste. Turns bread crusts into a delicious treat.
-
Quick and easy. Ready in about 25 minutes from start to finish.
-
Golden, buttery, and crispy. Every bite is perfect.
-
Garlicky and savory. The garlic butter is irresistible.
-
Crowd-pleasing. Kids and adults alike devour these.
-
Perfect for any occasion. Soup night, pasta night, or game days.
-
Budget-friendly. Uses ingredients you already have.
-
Minimal cleanup. One bowl, one baking tray.
-
Customizable. Add herbs, cheeses, or spices.
-
Beautiful presentation. Looks like they came from a fancy bakery.
The Ingredients
This recipe uses simple, affordable ingredients that come together beautifully.
-
10 soft sandwich bread crusts (white, wheat, or multigrain) – The star of the show.
-
4 tablespoons unsalted butter, melted – For richness and golden crispness.
-
1 tablespoon olive oil – For flavor and to help the butter spread.
-
2 cloves garlic, finely minced – For aromatic punch.
-
1 tablespoon fresh parsley, finely chopped(or 1 teaspoon dried parsley) – For freshness and color.
-
¼ teaspoon salt – Balances the flavors.
-
¼ teaspoon black pepper – For warmth.
-
3 tablespoons grated mozzarella or Parmesan cheese (optional, for a cheesy center) – For a gooey, savory center.
Step-by-Step Instructions
Step 1: Preheat the Oven
Preheat your oven to 350°F (180°C). Line a baking tray with high-quality parchment paper and set aside.
Pro Tip: Parchment paper makes cleanup a breeze and prevents sticking.
Step 2: Flatten the Bread
Lay your bread crusts flat on a clean surface. Using a rolling pin or a smooth glass, gently roll over each slice to flatten it. This prevents the bread from tearing when rolled.
Pro Tip: Don’t press too hard—you want to flatten the crusts, not crush them.
Step 3: Mix the Garlic Butter
In a small bowl, whisk together the melted butter, olive oil, minced garlic, chopped parsley, salt, and black pepper until well combined.
Pro Tip: Let the garlic butter sit for a few minutes to let the flavors meld.
Step 4: Assemble the Rolls
Using a pastry brush, generously coat one side of each flattened crust with the garlic butter mixture. If using cheese, sprinkle a small amount evenly over the buttered side.
Pro Tip: Be generous with the garlic butter—it’s what makes these rolls so delicious.
Step 5: Roll and Arrange
Tightly roll each crust into a small spiral log. Place the rolls seam-side down onto your prepared baking tray so they hold their shape.
Pro Tip: Roll tightly so the rolls don’t unravel during baking.
Step 6: Glaze
Brush any remaining garlic butter over the tops of the arranged rolls for maximum golden-brown crispness.
Pro Tip: Don’t skip this step—it’s what gives the rolls their beautiful golden color.
Step 7: Bake to Golden Perfection
Bake for 12–15 minutes, or until the rolls are beautifully golden and slightly crispy on the edges.
Pro Tip: Watch them closely toward the end—they can go from golden to burnt quickly.
Step 8: Serve and Enjoy
Remove from the oven and allow them to cool for 2-3 minutes. Serve warm alongside your favorite soup, pasta, or dipping sauce. Enjoy!
Pro Tip: Serve with marinara, ranch, or garlic aioli for dipping.
How to Serve It Like a Pro
These garlic rolls are delicious on their own, but a few simple accompaniments make them even better:
-
With marinara sauce – For dipping.
-
With ranch dressing – Creamy and tangy.
-
With garlic aioli – For extra garlicky goodness.
-
With Alfredo sauce – Creamy and rich.
-
With a bowl of soup – Perfect pairing.
-
With pasta – For a complete meal.
-
On a party platter – Arrange with other appetizers.
-
With a glass of red wine – Chianti or Merlot.
-
With a glass of white wine – Chardonnay or Sauvignon Blanc.
-
As a snack – For a quick, satisfying treat.
Variations & Swaps (Because Life Happens)
One of the best things about this recipe is how flexible it is. Here are some easy ways to make it your own:
Make It with Different Cheeses
-
Parmesan – For a sharper, nuttier finish.
-
Mozzarella – For a gooey, melty center.
-
Cheddar – For a bolder, sharper flavor.
-
Gruyère – Nutty and sophisticated.
-
Pepper Jack – For a spicy kick.
Make It with Different Herbs
-
Basil – Fresh and aromatic.
-
Oregano – Earthy and savory.
-
Thyme – Warm and woodsy.
-
Rosemary – Piney and robust.
-
Chives – Mild and oniony.
Make It with Add-Ins
-
Red pepper flakes – A pinch for heat.
-
Everything bagel seasoning – For a trendy twist.
-
Sesame seeds – For crunch.
-
Poppy seeds – For texture.
-
Lemon zest – For bright citrus flavor.
Make It Spicier
-
Add cayenne – A pinch for heat.
-
Add red pepper flakes – A pinch for warmth.
-
Add jalapeños – Minced for fresh heat.
-
Add hot sauce – A few dashes for kick.
Make It with Different Breads
-
Sourdough crusts – Tangy and crusty.
-
Rye crusts – Earthy and hearty.
-
Whole wheat crusts – For a healthier option.
-
Gluten-free bread crusts – For dietary needs.
Pro Tips for the Best Garlic Rolls
-
Flatten the crusts. Prevents tearing when rolled.
-
Be generous with garlic butter. It’s what makes them delicious.
-
Roll tightly. Tight rolls hold their shape.
-
Place seam-side down. Prevents unraveling.
-
Brush the tops. For maximum golden crispness.
-
Watch them closely. They can go from golden to burnt quickly.
-
Serve warm. These are best fresh from the oven.
-
Make extra. They disappear fast!
-
Experiment with fillings. Make them your own.
-
Serve with dipping sauces. Marinara, ranch, or garlic aioli.
Frequently Asked Questions
Can I use a different type of bread?
Yes. Sourdough, rye, whole wheat, or gluten-free bread crusts all work beautifully.
Can I use pre-minced garlic?
Yes. Use 1 teaspoon of pre-minced garlic.
Can I use dried parsley instead of fresh?
Yes. Use 1 teaspoon of dried parsley.
Can I make these without cheese?
Yes. Omit the cheese and add extra garlic butter.
Can I make these ahead of time?
Yes. Assemble the rolls, cover, and refrigerate for up to 24 hours. Bake as directed, adding a few minutes if needed.
How long do leftovers last?
Store in an airtight container at room temperature for up to 2 days. Reheat in the oven or air fryer to restore crispiness.
Can I freeze these rolls?
Yes. Freeze baked rolls in a freezer bag for up to 3 months. Reheat in the oven or air fryer.
Why did my rolls unravel?
You may not have rolled them tightly enough, or the seam wasn’t placed down. Roll tightly and place seam-side down.
Why are my rolls not crispy?
The oven may not be hot enough, or they didn’t bake long enough. Bake at 350°F until golden and crispy.
Can I add cheese?
Absolutely! Mozzarella or Parmesan adds a delicious gooey center.
Can I make these in the air fryer?
Yes. Air fry at 350°F for 6-8 minutes, until golden and crispy.
Can I double the recipe?
Yes. Use two baking trays and rotate them halfway through baking.
Storage & Reheating
Room Temperature
-
Store in an airtight container for up to 2 days.
Refrigerator
-
Store in an airtight container for up to 4 days. Reheat in the oven or air fryer.
Freezer
-
Freeze baked rolls in a freezer bag for up to 3 months. Reheat in the oven or air fryer.
Reheating Tips
-
Oven: Best method. 350°F for 5-7 minutes to restore crispiness.
-
Air Fryer: 350°F for 3-5 minutes.
-
Microwave: Works in a pinch but will soften the rolls.
Make-Ahead Tips
-
Prep Ahead: Flatten the crusts and make the garlic butter up to 2 days in advance. Store separately in the refrigerator.
-
Assemble Ahead: Assemble the rolls, cover, and refrigerate for up to 24 hours. Bake as directed.
-
Freeze Ahead: Freeze baked rolls for up to 3 months. Reheat in the oven or air fryer.
The Beauty of Simple, Zero-Waste Garlic Rolls
There’s something deeply satisfying about a recipe that delivers big flavor with minimal effort. These Sandwich Crust Garlic Rolls are the kind of treat that makes people happy—the kind that turns what would be trash into a treasure.
They’re not fancy. They’re not complicated. But they are reliable, crowd-pleasing, and absolutely delicious. And isn’t that what great snacks are all about?
So keep bread crusts, butter, olive oil, garlic, parsley, and cheese in your kitchen. And when you need a simple, impressive snack that delivers big flavor with minimal fuss, you’ll know exactly what to make.
Final Verdict
Rating: 5 out of 5
Difficulty: Easy
Prep Time: 10 minutes
Cook Time: 12-15 minutes
Total Time: Approximately 25 minutes
Yield: 10 rolls
Cleanup: Minimal (one bowl + one baking tray)
Leftover potential: Good — reheat in oven or air fryer
Best for: Soup night, pasta night, game days, and anytime you need a crowd-pleasing snack