
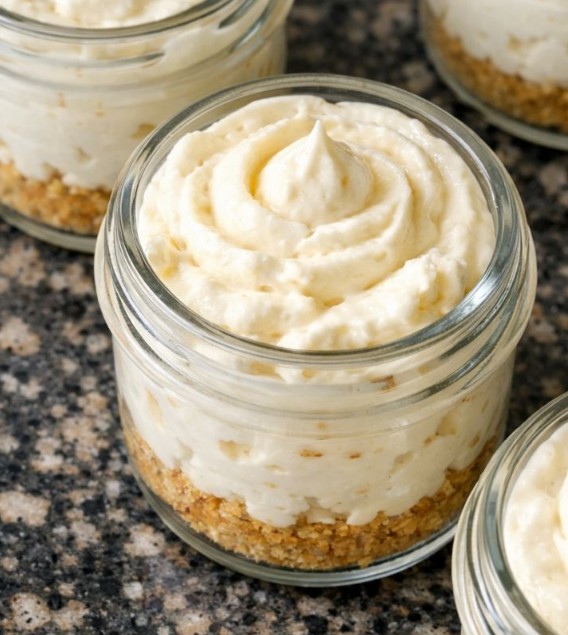
The filling combines softened cream cheese, sugar, vanilla, and cold heavy cream. A brief chill helps it firm slightly while keeping its soft, spoonable texture. Each cup delivers the familiar flavor of cheesecake without the work of preparing a full-sized cake.
Leave the tops plain with a simple swirl, or add a few berries or a little jam just before serving. This recipe makes six modest portions, perfect for a small gathering or a make-ahead dessert.
Why You’ll Love These Cheesecake Cups
- No baking required: Both layers come together without heating the oven.
- Individual portions: Serve directly from jars, glasses, or ramekins.
- Simple ingredients: Graham crackers, cream cheese, cream, sugar, and vanilla.
- No gelatin: The filling stays naturally creamy and spoonable.
- Easy to prepare ahead: Cover and refrigerate until serving.
- Flexible toppings: Enjoy plain or finish with fruit, jam, or chocolate.
What Are No-Bake Cheesecake Cups?
No-bake cheesecake cups are individual layered desserts with a crumb base and a chilled cream cheese filling. Unlike baked cheesecake, they contain no eggs and do not need oven time.
This version has a soft, mousse-like consistency rather than a firm, sliceable texture. The lightly pressed crumbs remain easy to scoop, making each spoonful a combination of creamy filling and buttery crunch.
Ingredients You’ll Need
Graham Cracker Crumbs
Use 1 cup graham cracker crumbs, measured after crushing. Fine crumbs create a more even base than large cracker pieces.
You can use packaged crumbs or crush whole graham crackers in a food processor or sealed food-storage bag.
Granulated Sugar
The recipe uses sugar in two separate places: 3 tablespoons for the crumb layer and ⅓ cup for the cheesecake filling.
Measure them separately before starting. Fine granulated sugar blends into the cream cheese more readily than coarse sugar.
Unsalted Butter
Four tablespoons melted unsalted butter moisten the crumbs and give the base its rich flavor. Stir thoroughly so there are no dry pockets.
Cream Cheese
Use 8 ounces full-fat block cream cheese, softened to room temperature. It should be easy to beat but not melted.
Softening is important for a smooth filling. Cold cream cheese can leave lumps that are difficult to remove once the cream is added.
Vanilla Extract
One teaspoon pure vanilla extract gives the filling its classic flavor and complements the graham cracker base.
Heavy Cream
Use ⅓ cup cold heavy cream or whipping cream suitable for whipping. Heavy cream generally provides a richer, more stable texture.
Keep it refrigerated until needed. Milk and half-and-half are not direct substitutes because they will not whip and thicken in the same way.
Optional Salt
A small pinch of fine salt balances the sweetness. It is optional, especially if your graham crackers are already noticeably salty.
How to Make No-Bake Cheesecake Cups
1. Set Out the Serving Cups
Arrange six small food-safe jars, ramekins, or glasses on a tray. Containers with a capacity of 4–6 ounces work well, though the recipe may not fill larger glasses to the top.
Make sure the containers are clean and dry before adding the layers.
2. Mix the Crumb Base
Stir the graham cracker crumbs and 3 tablespoons sugar together in a small bowl. Add the melted butter and mix with a fork until the crumbs resemble damp sand.
3. Divide Among the Cups
Distribute the crumbs evenly among the six containers, approximately 3 tablespoons per cup. Press lightly with the back of a spoon to create a level base.
Avoid packing the crumbs tightly. A compact crust can become difficult to scoop once chilled.
4. Beat the Cream Cheese Filling
In a medium bowl, beat the softened cream cheese, ⅓ cup sugar, vanilla, and optional salt until smooth. Scrape down the sides and bottom of the bowl as needed.
Work out visible cream cheese lumps at this stage. The mixture should look creamy and evenly blended before adding the cold cream.
5. Add the Cold Cream
Pour in the cold heavy cream. Beat briefly on low to incorporate, then increase to medium-high and beat until the mixture thickens and becomes fluffy, approximately 1–2 minutes.
Use the texture as your guide: the filling should hold soft mounds while remaining easy to spoon. Stop once thickened rather than continuing to beat unnecessarily.
6. Fill the Cups
Spoon the filling evenly over the crumb bases. You can also transfer it to a piping bag for tidier layers.
Use the back of a spoon to make a soft swirl on each cup. Divide by portion rather than filling every container to the rim, since glass sizes vary.
7. Chill
Cover and refrigerate for at least 30 minutes. A longer chill of 1–2 hours gives a cooler, slightly firmer filling, but the dessert will remain spoonable.
8. Add Toppings and Serve
Serve chilled with small spoons. Add fresh berries, jam, or other toppings just before serving to keep the presentation fresh.
Tips for Smooth, Creamy Cheesecake Cups
- Soften the cream cheese fully. This is the most important step for avoiding lumps.
- Keep the cream cold. Cold cream whips more effectively.
- Beat the base before adding cream. Smooth out the cream cheese while the mixture is still easy to work.
- Scrape the bowl. Unmixed cream cheese can hide along the bottom and sides.
- Press the crumbs lightly. The base should be easy to scoop with a spoon.
- Do not overbeat. Stop when the filling is thick and fluffy.
- Allow chilling time. The freshly mixed filling is softer than the refrigerated dessert.
Topping Ideas
Fresh Berries
Add sliced strawberries, blueberries, or raspberries. Wash and dry them thoroughly before placing them on the filling.
Jam or Fruit Preserves
Spoon a small amount over each cup. Stir thick jam separately to loosen it rather than adding water.
Chocolate
Finish with chocolate shavings, mini chocolate chips, or a light drizzle of cooled chocolate sauce.
Extra Graham Cracker Crumbs
Sprinkle a few additional crumbs over the top just before serving for a little crunch.
These toppings are optional and are not included in the base recipe quantities.
Make-Ahead Instructions
Prepare the cups the day before serving and refrigerate them covered. Add moist fruit toppings shortly before serving rather than leaving them on the filling overnight.
The crumb layer will soften gradually as it sits beneath the filling. For more contrasting texture, assemble closer to serving time and allow the minimum 30-minute chill.
Storage Tips
Keep the cheesecake cups covered in the refrigerator for up to 2 days. Cover individual jars with lids or cover the serving tray without touching the filling.
Freezing is not recommended for the texture described here. The filling may become less smooth after thawing, and the crumbs can soften.
Frequently Asked Questions
Will these cups set like regular cheesecake?
No. This filling is designed to stay soft and creamy. It is served with a spoon rather than unmolded or sliced.
Can I use a different cookie for the base?
Yes. Digestive biscuits or similar crisp cookies can replace the graham crackers. Their sweetness and fat content vary, so you may prefer less sugar in the crumb layer.
Can I use milk instead of heavy cream?
No. Milk will thin the filling rather than whip into it. Use cold heavy cream or whipping cream suitable for whipping.
Why is my filling lumpy?
The cream cheese was likely too cold or not beaten smooth before adding the cream. Start with softened cream cheese and scrape the bowl thoroughly during mixing.
Why is my filling too loose?
The cream may not have been cold enough, the product may have too little fat to whip well, or the mixture may need more chilling time. Use full-fat block cream cheese and cold whipping cream for the most predictable result.
Can I make these without an electric mixer?
A sturdy whisk can work, but it takes more effort to smooth the cream cheese and aerate the filling. An electric hand mixer is easier and more consistent.
Can I double the recipe?
Yes. Double all ingredients and divide among 12 small cups. Use a bowl large enough to whip the filling without splashing.
No-Bake Cheesecake Cups Recipe Card
Individual vanilla cheesecake desserts with a buttery graham cracker base and a soft, fluffy cream cheese filling.
- Prep Time: Approximately 20 minutes
- Chill Time: At least 30 minutes
- Total Time: Approximately 50 minutes, plus cream cheese softening
- Servings: 6
- Category: Dessert
- Method: No-bake
Ingredients
Crumb Layer
- 1 cup graham cracker crumbs
- 3 tablespoons granulated sugar
- 4 tablespoons unsalted butter, melted
Cheesecake Filling
- 8 ounces full-fat block cream cheese, softened to room temperature
- ⅓ cup granulated sugar
- 1 teaspoon pure vanilla extract
- ⅓ cup heavy cream or whipping cream, cold
- Pinch of fine salt, optional
Instructions
- Set out six small food-safe jars, ramekins, or glasses with a capacity of approximately 4–6 ounces each.
- Mix the graham cracker crumbs and 3 tablespoons sugar. Stir in the melted butter until evenly moistened.
- Divide the crumbs among the cups and press lightly into a loose, even base.
- Beat the softened cream cheese, ⅓ cup sugar, vanilla, and optional salt until completely smooth, scraping the bowl as needed.
- Add the cold cream. Beat on low briefly, then medium-high until thick and fluffy, approximately 1–2 minutes.
- Divide the filling evenly over the crumb bases and swirl the tops with a spoon.
- Cover and refrigerate for at least 30 minutes.
- Add optional toppings just before serving and enjoy chilled.
Notes
Texture: The filling remains soft and spoonable rather than firm enough to slice.
Portions: Larger glasses may not be filled to the top. Divide the mixture evenly among six servings.
Smooth filling: Beat out cream cheese lumps before adding the cold cream.
Storage: Keep covered in the refrigerator for up to 2 days.