
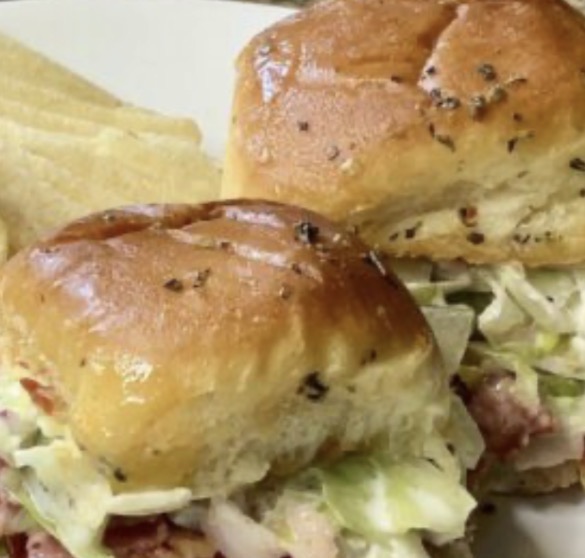
Why This Recipe Is an Absolute Keeper
Before we dive into the method, here’s why these chopped Italian sliders will become a staple in your kitchen:
-
Simple ingredients. Shredded lettuce, mayonnaise, red onion, dill pickles, banana peppers, submarine dressing, deli ham, salami, pepperoni, Hawaiian rolls, provolone, butter, and Italian seasoning. That’s it!
-
Quick and easy. Ready in about 25 minutes from start to finish.
-
Savory, tangy, and crunchy. Every bite is perfectly balanced.
-
Buttery, toasted rolls. They’re the perfect base.
-
Gooey, melted provolone. It adds richness and depth.
-
Warm, savory deli meats. They’re packed with flavor.
-
Cool, crunchy salad topping. It adds contrast and freshness.
-
Crowd-pleasing. Kids and adults alike devour these.
-
Budget-friendly. Simple, affordable ingredients.
-
Beautiful presentation. Looks like they came from a fancy deli.
The Ingredients
This recipe uses simple, wholesome ingredients that come together beautifully.
For the Salad Topping:
-
8 ounces shredded lettuce – For crunch and freshness.
-
½ cup mayonnaise – For creaminess and tang.
-
¼ cup red onion, diced – For bite and flavor.
-
½ cup dill pickles, chopped – For tang and crunch.
-
½ cup pickled banana peppers, chopped – For heat and tang.
-
3 tablespoons Beano Submarine Dressing– For tangy, herby depth.
For the Meats:
-
4 ounces deli sliced ham – For savory, salty depth.
-
4 ounces deli sliced salami – For richness and flavor.
-
4 ounces deli sliced pepperoni – For spice and depth.
-
King’s Hawaiian Savory Butter Rolls (12 count) – For buttery, fluffy sliders.
-
4–6 ounces smoked provolone cheese, sliced – For a gooey, smoky melt.
-
2 tablespoons butter, melted – For brushing the tops.
-
1 tablespoon dried Italian seasoning – For herbal, aromatic flavor.
Step-by-Step Instructions
Step 1: Preheat the Oven
Preheat the oven to 400°F.
Pro Tip: A hot oven ensures the rolls toast and the cheese melts beautifully.
Step 2: Toast the Bottom Rolls
Cut the rolls in half, and set the top buns aside. Spread a few tablespoons of mayonnaise on the bottom buns. Place in the oven-safe tray or a 9×13 baking dish and bake for 7–10 minutes or until they are golden brown.
Pro Tip: Toasting the bottom rolls prevents them from getting soggy.
Step 3: Heat the Meats
While the rolls are in the oven chop up the deli meats and heat thoroughly in a skillet over medium heat.
Pro Tip: Chopping the meats makes them easier to pile onto the sliders.
Step 4: Make the Salad Topping
Mix together all of the ingredients for the salad topping.
Pro Tip: Make the salad topping just before assembling so it stays crisp.
Step 5: Assemble the Sliders
When the bottom rolls are toasted place a layer of provolone on top, followed by the heated meats. Cover with the top buns. Mix the melted butter and Italian seasoning together and brush on top. Bake for another 5–7 minutes.
Pro Tip: Brushing the tops with Italian-seasoned butter adds flavor and helps them brown.
Step 6: Add the Salad and Serve
Carefully remove the top buns and cover the meat with the salad mixture. Place the top buns back on and slice them up carefully and enjoy!
Pro Tip: Use a serrated knife to slice the sliders cleanly.
How to Serve It Like a Pro
These chopped Italian sliders are delicious on their own, but a few simple accompaniments make them even better:
-
With a side of marinara – For dipping.
-
With a side of pesto – For a fresh, herby twist.
-
With a simple green salad – Balances the richness.
-
With a side of chips – For crunch.
-
With a side of pasta salad – For a complete meal.
-
On a party platter – Arrange with other appetizers.
-
With a cold beverage – Beer, sweet tea, or lemonade.
-
At game day gatherings – Always a crowd favorite.
-
For holiday parties – Elegant enough for Christmas or New Year’s.
-
As a main course – Serve with a side of roasted vegetables.
Variations & Swaps (Because Life Happens)
One of the best things about this recipe is how flexible it is. Here are some easy ways to make it your own:
Make It with Different Meats
-
Turkey – For a leaner alternative.
-
Roast beef – For a heartier twist.
-
Capicola – For a spicy, savory twist.
-
Prosciutto – For an elegant twist.
-
Chicken – Sliced or shredded for a lighter option.
Make It with Different Cheeses
-
Mozzarella – For a gooey, stretchy melt.
-
Provolone – The classic choice.
-
Swiss – For a nutty twist.
-
Gruyère – For a rich, sophisticated twist.
-
Pepper Jack – For a spicy kick.
Make It with Add-Ins
-
Pepperoncini – For tangy heat.
-
Roasted red peppers – For sweetness and smokiness.
-
Olives – Sliced for briny depth.
-
Tomatoes – Sliced for freshness.
-
Fresh basil – For a pop of color and freshness.
-
Oregano – For herbal depth.
Make It Spicier
-
Add cayenne – A pinch for heat.
-
Add red pepper flakes – A pinch for warmth.
-
Add jalapeños – Minced for fresh heat.
-
Use spicy salami – For extra kick.
-
Add hot sauce – A few dashes for kick.
Make It with Different Rolls
-
Hawaiian rolls – The classic choice.
-
Slider buns – Classic and sturdy.
-
Pretzel buns – For a salty twist.
-
Croissants – For a buttery, flaky twist.
-
Ciabatta – For a rustic twist.
Pro Tips for the Best Chopped Italian Sliders
-
Toast the bottom rolls. Prevents sogginess.
-
Chop the meats. Makes them easier to pile onto the sliders.
-
Heat the meats. Warm meats taste better and melt the cheese.
-
Make the salad topping fresh. Keeps it crisp.
-
Brush the tops with Italian-seasoned butter. Adds flavor and helps them brown.
-
Watch the sliders closely. The rolls can go from golden to burnt quickly.
-
Add the salad topping last. Keeps it crisp and fresh.
-
Use a serrated knife. For clean slices.
-
Serve warm. These are best fresh from the oven.
-
Make extra. They disappear fast!
Frequently Asked Questions
Can I use a different type of meat?
Yes. Turkey, roast beef, capicola, prosciutto, or chicken all work beautifully.
Can I use a different type of cheese?
Yes. Mozzarella, Swiss, Gruyère, or Pepper Jack all work beautifully.
Can I use a different type of roll?
Yes. Slider buns, pretzel buns, croissants, or ciabatta all work beautifully.
Can I make these ahead of time?
Yes. Assemble the sliders up to 4 hours in advance (without the salad topping), cover, and refrigerate. Bake as directed, then add the salad topping before serving.
How long do leftovers last?
Store in an airtight container in the refrigerator for up to 3 days. Reheat in the oven or air fryer to restore crispiness.
Can I freeze these sliders?
Freezing is not recommended, as the rolls and salad topping can become soggy upon thawing.
Why are my sliders soggy?
The rolls may not have been toasted enough, or the salad topping was added too early. Toast the rolls and add the salad topping just before serving.
Why is my cheese not melting?
The oven may not be hot enough, or the sliders didn’t bake long enough. Bake at 400°F until the cheese is melted.
Can I add vegetables?
Absolutely! Pepperoncini, roasted red peppers, or olives all work beautifully.
Can I make these in the air fryer?
Yes. Air fry at 375°F for 5-7 minutes, until the cheese is melted and the rolls are golden.
Can I double the recipe?
Yes. Use two baking dishes and rotate them halfway through baking.
Is this recipe gluten-free?
Use gluten-free rolls for a gluten-free version.
Storage & Reheating
Refrigerator
-
Store cooled sliders in an airtight container for up to 3 days.
-
Reheat in the oven at 350°F for 5-7 minutes, or in the air fryer at 350°F for 3-5 minutes.
Freezer
-
Freezing is not recommended due to texture changes in the rolls and salad topping.
Reheating Tips
-
Oven: Best method. 350°F for 5-7 minutes to restore crispiness.
-
Air Fryer: 350°F for 3-5 minutes.
-
Microwave: Works in a pinch but will soften the rolls.
Make-Ahead Tips
-
Prep Ahead: Chop the meats and make the salad topping up to 4 hours in advance. Store separately in the refrigerator.
-
Assemble Ahead: Assemble the sliders without the salad topping, cover, and refrigerate for up to 4 hours. Bake as directed, then add the salad topping before serving.
-
Freeze Ahead: Freezing is not recommended.
The Beauty of Simple, Savory, Tangy Chopped Italian Sliders
There’s something deeply satisfying about a recipe that delivers big flavor with minimal effort. These Chopped Italian Sliders are the kind of treat that makes people happy—the kind that brings everyone to the table with a smile.
They’re not fancy. They’re not complicated. But they are reliable, crowd-pleasing, and absolutely delicious. And isn’t that what great sliders are all about?
So keep shredded lettuce, mayonnaise, red onion, dill pickles, banana peppers, submarine dressing, deli ham, salami, pepperoni, Hawaiian rolls, provolone, butter, and Italian seasoning in your kitchen. And when you need a simple, impressive appetizer that delivers big flavor with minimal fuss, you’ll know exactly what to make.
Final Verdict
Rating: 5 out of 5
Difficulty: Easy
Prep Time: 10 minutes
Cook Time: 10 minutes
Total Time: Approximately 20-25 minutes
Yield: 4 servings (12 sliders)
Cleanup: Moderate (one skillet + one baking dish + one bowl)
Leftover potential: Good — reheat in oven or air fryer
Best for: Game days, potlucks, holiday parties, and anytime you need a crowd-pleasing appetizer